

How To Apply Xslt To Xml Windows Form App C#
- Download XML and XSL in C# - 86.51 KB
Introduction
When I started working on XML for my project, I was very new to the concept. Of course there are a lot of resources you can find on internet regarding how to read and write XML file in .NET, how to transform it in HTML file, how to change the existing XML file. But I didn't find a single resource that covers all these topics.
In this example I have included all these topics like creating XML file, reading XML file, adding elements and attributes to existing XML file, transforming XML to HTML passing attributes from .cs file to .xsl file.
Using the code
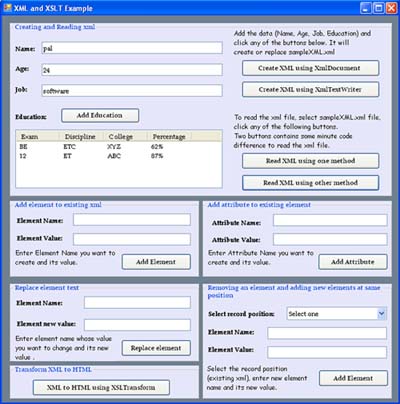
Creating and Reading XML
In this example, I have created an XML file using two techniques.
- Using
XmlDocument - Using
XmlTextWriter
Fill the fields Name, Age, Job, Education, click 'Create XML using XmlDocument' or 'create XML using XmlTextWriter' button, XML file (sampleXML.xml) will create.
sampleXML.xml
=" 1.0" =" utf-8" < Sample name =" pal" > < Name >pal< /Name > < Age >24< /Age > < Job >software< /Job > < Education > < Exam >BE< /Exam > < Discipline >ETC< /Discipline > < College >XYZ< /College > < Percent >62%< /Percent > < /Education > < Education > < Exam >12< /Exam > < Discipline >ET< /Discipline > < College >ABC< /College > < Percent >87%< /Percent > < /Education > < /Sample >
Let's discuss the code now. To work with XML, first you need to add the System.Xml namespace.
Using XmlDocument
XmlDocument xmldoc = new XmlDocument(); XmlElement ElmntRoot; private void createXML() { xmldoc.RemoveAll(); xmldoc.AppendChild(xmldoc.CreateProcessingInstruction(" xml", " version='1.0'")); SaveFileDialog sfd = new SaveFileDialog(); sfd.FileName = Application.StartupPath + " \\sampleXML.xml"; ElmntRoot = xmldoc.CreateElement(" Sample"); ElmntRoot.SetAttribute(" name", textBox1.Text); XmlElement ele1 = null; ele1 = xmldoc.CreateElement(" Name"); ele1.InnerText = textBox1.Text; ElmntRoot.AppendChild(ele1); XmlElement ele2 = null; ele2 = xmldoc.CreateElement(" Age"); ele2.InnerText = textBox2.Text; ElmntRoot.AppendChild(ele2); XmlElement ele3 = null; ele3 = xmldoc.CreateElement(" Job"); ele3.InnerText = textBox3.Text; ElmntRoot.AppendChild(ele3); foreach (ListViewItem item in listView1.Items) { XmlElement ele4 = null; ele4 = xmldoc.CreateElement(" Education"); XmlElement child1 = null; child1 = xmldoc.CreateElement(" Exam"); child1.InnerText = item.SubItems[0].Text; ele4.AppendChild(child1); XmlElement child2 = null; child2 = xmldoc.CreateElement(" Discipline"); child2.InnerText = item.SubItems[1].Text; ele4.AppendChild(child2); XmlElement child3 = null; child3 = xmldoc.CreateElement(" College"); child3.InnerText = item.SubItems[2].Text; ele4.AppendChild(child3); XmlElement child4 = null; child4 = xmldoc.CreateElement(" Percent"); child4.InnerText = item.SubItems[3].Text; ele4.AppendChild(child4); ElmntRoot.AppendChild(ele4); } xmldoc.AppendChild(ElmntRoot); xmldoc.Save(sfd.FileName); MessageBox.Show(" XML file created.", " Sample", MessageBoxButtons.OK, MessageBoxIcon.Information); System.Diagnostics.Process.Start(sfd.FileName); }
To create XML using XmlDocument, first declare an object of XmlDocument.
XmlDocument xmldoc = new XmlDocument(); Then remove all nodes and attributes (if they already exists).
xmldoc.RemoveAll();
Declare the root element, XmlElement ElmntRoot; The root element is the parent element for all other elements.
CreateElement is used to create a new element in the XML file.
For example, I have created the root element as follows;
ElmntRoot = xmldoc.CreateElement(" Sample");
where "Sample" is the element name.
If you want to set attributes at the current node then use SetAttribute as follows:
ElmntRoot.SetAttribute(" name", textBox1.Text);
In this, name is the name of the attribute and textBox1.Text is the value of the attribute.
An element can have other elements and elements can have attributes too.
Now let's add a child element under the root element as follows:
XmlElement ele1 = null; ele1 = xmldoc.CreateElement(" Name"); ele1.InnerText = textBox1.Text; ElmntRoot.AppendChild(ele1);
InnerText is used to set the current element value. Once the child element and its value are declared, append the child element to the root element as follows;
ElmntRoot.AppendChild(ele1);
AppendChild is used to add a specified node to the end of the list of child nodes, of this node.
You can add more child nodes just as mentioned above.
To make the XML a little more complex, see the code for adding listview data in XML.
In this code, I have added listviewitem contents under <Education></Education> tags.
Create child elements for each listviewitem content as shown in the code.
In this case <Education> will act as a parent element to its child elements <Exam>, <Discipline>, <College>, <Percent>. These child elements are appended to its parent element <Education>.This parent element finally is appended to root element.
Remember in an XML file, the root element must be declared. All other elements are added under this root element. And all elements should have a start tag <Name> and end tag </Name>. Once you have added all elements and attributes, and appended them to the root element, the final step is to append this root element to xmldocument as follows:
xmldoc.AppendChild(ElmntRoot);
And then save the XML file to the specified location.
xmldoc.Save(sfd.FileName);
Using XmlTextWriter
private void Createxml1() { SaveFileDialog sfd = new SaveFileDialog(); sfd.FileName = Application.StartupPath + " \\sampleXML.xml"; XmlTextWriter textWriter = new XmlTextWriter(sfd.FileName, Encoding.UTF8); try { textWriter.Formatting = Formatting.Indented; textWriter.WriteStartDocument(); textWriter.WriteComment(" Your comments."); textWriter.WriteStartElement(" Sample"); textWriter.WriteAttributeString(" name", textBox1.Text); textWriter.WriteElementString(" Name", textBox1.Text); textWriter.WriteElementString(" Age", textBox2.Text); textWriter.WriteElementString(" Job", textBox3.Text); foreach (ListViewItem item in listView1.Items) { textWriter.WriteStartElement(" Education"); textWriter.WriteElementString(" Exam", item.SubItems[0].Text); textWriter.WriteElementString(" Discipline",item.SubItems[1].Text); textWriter.WriteElementString(" College", item.SubItems[2].Text); textWriter.WriteElementString(" Percent", item.SubItems[3].Text); textWriter.WriteEndElement(); } textWriter.WriteFullEndElement(); MessageBox.Show(" XML file created.", " Sample", MessageBoxButtons.OK, MessageBoxIcon.Information); System.Diagnostics.Process.Start(sfd.FileName); } catch (Exception ex) { MessageBox.Show(ex.Message); } finally { textWriter.WriteEndDocument(); textWriter.Flush(); textWriter.Close(); } }
Declare an object of XmlTextWriter, giving XML file fullpath, and encoding technique.
XmlTextWriter textWriter = new XmlTextWriter(sfd.FileName, Encoding.UTF8); Code to create XML using XmlTextWriter is different from XmlDocument.
Here first open the XML document to write using code:
textWriter.WriteStartDocument();
If you want to add comments in your XML, then use
textWriter.WriteComment(" Your comments.");
To create root element, use:
textWriter.WriteStartElement(" Sample");
You can add attributes to element using:
textWriter.WriteAttributeString(" name", textBox1.Text);
Child elements can be added as follows
textWriter.WriteElementString(" Name", textBox1.Text);
For each WriteStartElement, there must be its closing property WriteEndElement() as follows;
textWriter.WriteEndElement();
Please note that WriteStartElement and WriteEndElement must be in proper sequence to avoid further errors.
Then create full end tag using
textWriter.WriteFullEndElement();
This is used in case when we have xml tag like <Name />, It does not have a full end element. WriteFullEndElement() will convert this to something like this, <Name></Name> so that end tag will work properly.
Finally end the XML document and close it.
textWriter.WriteEndDocument(); textWriter.Flush(); textWriter.Close();
This is all about creating xml in C# using XmlDocument and XmlTextWriter. You can find the code for editing/replacing any element or attribute, adding new element in an existing xml in the attached sample application.
Now lets see how to translate XML into HTML using XSL stylesheet.
XML to HTML using XSLT
I am assuming you have basic knowledge on XSL stylesheet. If not, then I will suggest you to get a basic knowledge on creating XSL file. In attached sample application, you can find sample-stylesheet.xsl in Debug folder.
XSLT is XSL Transformation. This is used to convert any XML document into another type of documents which is recognized by browser (HTML).
Now lets go into the coding part. Following is a code to convert XML file into HTML.
string xmlfile = Application.StartupPath + " \\sampleXML.xml"; string logo = Application.StartupPath + " //" + " 1rightarrow-32.png"; string name = textBox1.Text; XsltArgumentList xslArgs = new XsltArgumentList(); xslArgs.AddParam(" logo", " ", logo); xslArgs.AddParam(" name", " ", name); XslTransform xslt = new XslTransform(); xslt.Load(" sample-stylesheet.xsl"); XPathDocument xpath = new XPathDocument(xmlfile); XmlTextWriter xwriter = new XmlTextWriter(xmlfile + " .html", Encoding.UTF8); xslt.Transform(xpath, xslArgs, xwriter, null); xwriter.Close();
Create object of XSLT .
XslTransform xslt = new XslTransform(); or
XslCompiledTransform xslt = new XslCompiledTransform(); Load your stylesheet in this object
xslt.Load(" sample-stylesheet.xsl");
Load your XML file using XPathDocument:
XPathDocument xpath = new XPathDocument(xmlfile); You can pass parameter to your stylesheet from our code using XsltArgument.
XsltArgumentList xslArgs = new XsltArgumentList(); xslArgs.AddParam(" logo", " ", logo); xslArgs.AddParam(" name", " ", name);
In the stylesheet, parameters are defined as follows
< xsl:param name =" logo" / > < xsl:param name =" name" / >
In the above xslArgs.AddParam code, first parameter "logo" is a name of param you have defined in stylesheet and third parameter "logo" is a value you want to pass to your stylesheet. In sample application attached, I am passing an Image file and a String to a stylesheet which will be shown in our HTML file. Note: XsltArgumentList is optional. If you don't want to pass any arguments, then just write NULL in place of xslArgs in following code. Finally pass these arguments to our object.
xslt.Transform(xpath, xslArgs, xwriter, null); xwriter.Close(); Done !!! :) You can convert XML into DOC file too using same above xslt code. Just change ".html" to ".doc" in XmlTextWriter object. Try it yourself. If you have any queries and suggestions, let me know. :)
How To Apply Xslt To Xml Windows Form App C#
Source: https://www.codeproject.com/Articles/87621/Introduction-to-XML-and-XSLT-in-Csharp-NET
Posted by: deansthiletwed.blogspot.com
0 Response to "How To Apply Xslt To Xml Windows Form App C#"
Post a Comment